
Help center/Chase/Auto statements
Statement settings and templates
Pick the template your statement PDFs use, design your own with the AI builder, build spreadsheet (CSV) templates, and manage the standard statements.
Updated 11 November 2026
The Statements tab of Organisation Settings controls how your statements look, both the ones attached to statement emails and the ones you or your customers download. Every organization can design its own PDF templates with the AI builder, build spreadsheet templates that come out as CSV files, and choose which of them each statement email attaches.
Go to Organisation Settings, Statements. The page has up to three tabs:
- Common: settings that apply to every statement, whichever template it uses.
- Standard: settings for the standard statement. You only see this tab if your organization still has the standard statements. Organizations that were active on Paidnice before custom templates were released kept them. Newer organizations don’t have them.
- Custom: your PDF and spreadsheet templates, and the AI builder.
Common settings
- Default statement template: the template an outstanding statement PDF uses unless a statement policy attaches a different one. The list has every published PDF template. If you don’t have the standard statement, it also has Paidnice default, the built-in layout. The change applies as soon as you pick, with no Save. Activity statements always use the standard template.
- Statement Invoice Links: where the invoice links on statement PDFs go. Customer Portal opens the invoice in the customer portal. Disabled leaves the links off. On Xero and QuickBooks there is also a Direct to option that links to the invoice in your accounting system, and uses the portal for any invoice with no shareable link.
- Always use legal name: always shows your organization’s legal name, even when “Use Display Name” is on.
- Separate projects & jobs (QuickBooks only): when a child contact is flagged as a job or project in QuickBooks, it gets its own section on the statement.
Click Save after changing the last three.
Custom templates
The Custom tab lists your templates. If you still have the standard statements they are in the list too, marked Standard.
- Template: the name. Click it, or Edit, to open the template.
- Type: PDF, Outstanding spreadsheet or Activity spreadsheet.
- Status: where the template is up to.
- Draft: never published. Customers can’t get this template yet.
- Unpublished changes: a version is published, and the draft has edits that are not. Customers still get the published version.
- Published: a version is ready, but no statement uses it. A spreadsheet template stays Published even when policies attach it.
- Live: the published version is on customer statements. Only PDF templates show this.
- Built in: a standard statement.
- Where it is used: Default for all statements, Used by 1 policy (or however many), or Not used on statements. Portal downloads are not counted here.
- Last published: the date and who published it, or Never. A standard statement shows Not editable.
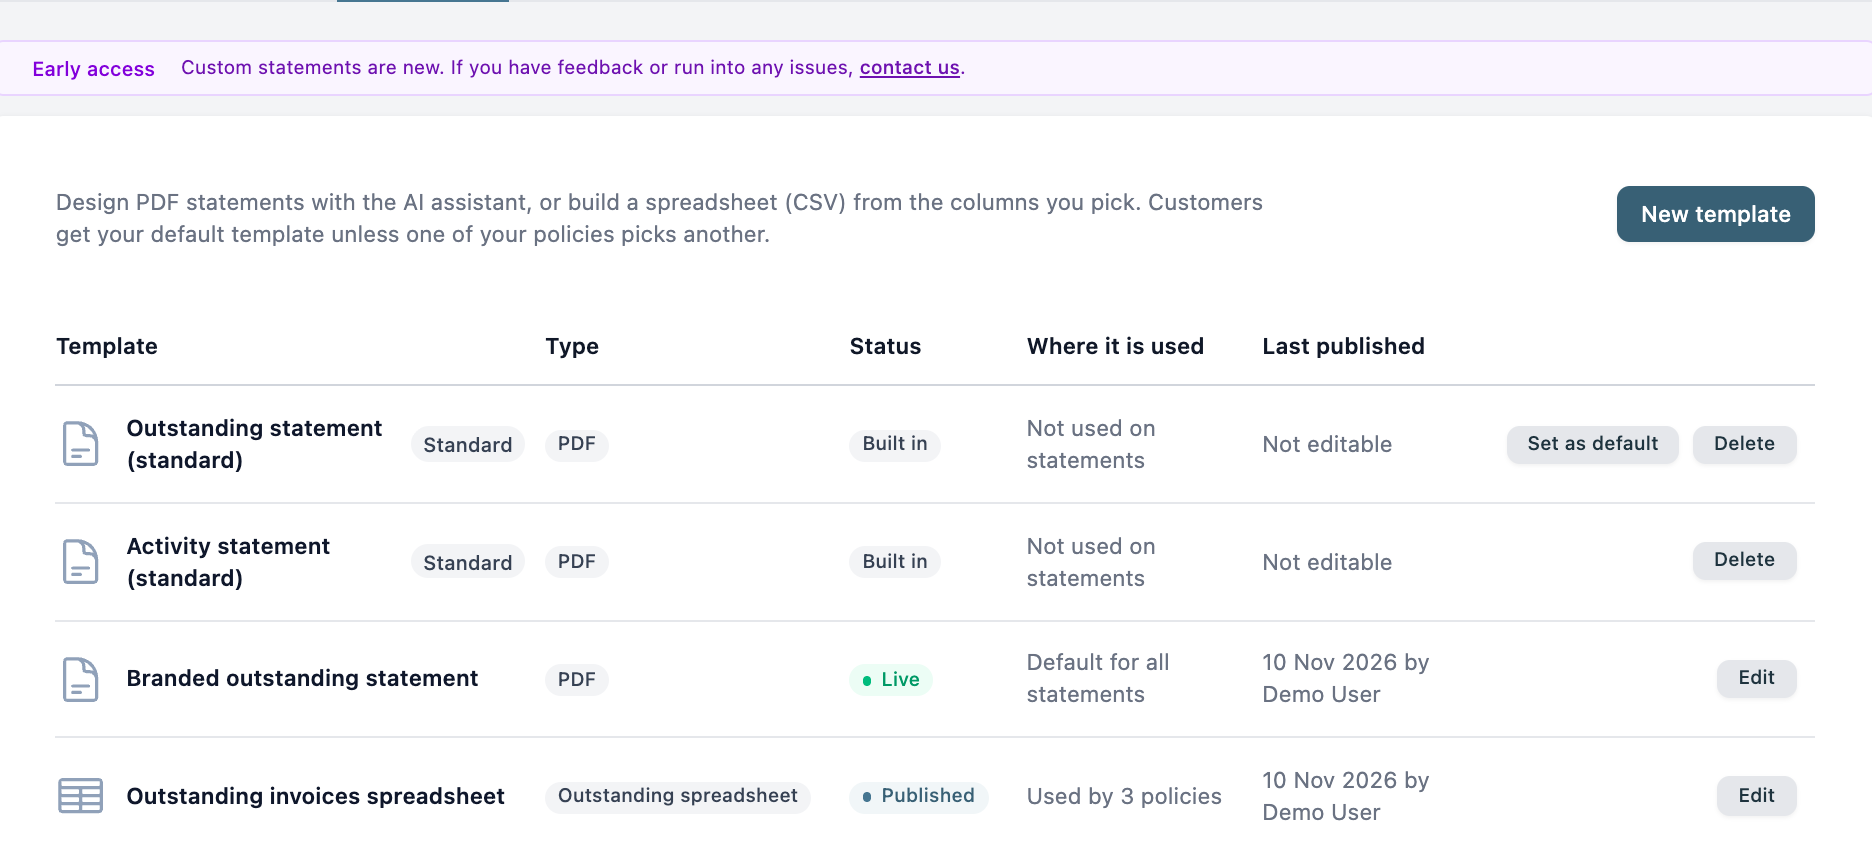
To add a template, click New template, give it a title, pick a Type and click Create.
- PDF statement: a layout you design with the AI assistant. It starts from the Paidnice base layout.
- Spreadsheet (CSV): a CSV file made from the columns you pick. On Xero you also choose which Statement it lists. Outstanding is what the customer owes now, one row per unpaid invoice or credit. Activity is every transaction in a period you set, with a running balance. You can’t change this once the template is created. On other accounting systems a spreadsheet is always outstanding.
The first time an organization with no templates opens the tab, Paidnice creates a PDF template called “Custom statement” to start from.
Editing a PDF template
The editor shows a preview of the statement on the left, with Chat and Options tabs on the right.
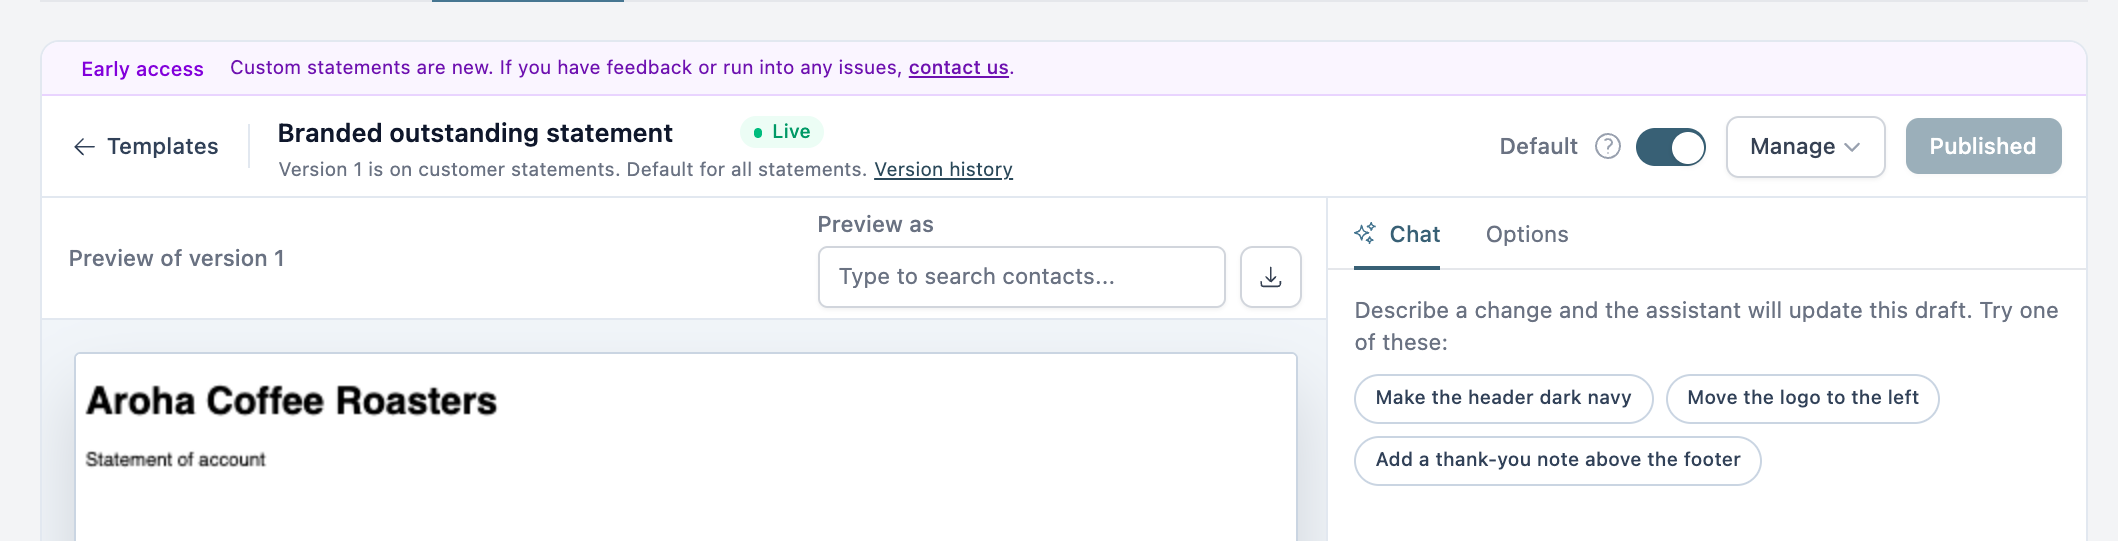
- Chat: describe the change you want in plain words, such as “Move the logo to the left” or “Add a thank-you note above the footer”. The assistant updates the draft and the preview refreshes. To undo, click Revert to here under an earlier reply. Later changes stay in the chat history.
- Options: settings that belong to this template. Recent activity sets how far back the template’s recent activity section goes, if it has one. It starts at 30 days and takes up to 1096 days or 36 months, counted back from the end date of the statement period. Aged analysis sets up to three breakpoints, in days overdue. Group statement lines groups lines by days until due. Use 0 to split overdue from outstanding on the due date. Footer is the text printed at the bottom of the statement, such as payment details, up to 10,000 characters. The assistant in Chat can’t change the footer. One Save at the bottom of the tab saves all four. A new template copies its aged analysis and grouping from your organization’s statement settings, and its footer from your portal footer.
- Preview as: pick a contact to preview the template with their real outstanding statement. Leave it empty to preview with sample data.
- Download PDF: the button beside Preview as downloads the preview as a PDF. It shows a spinner while the PDF is generated. Spacing in the PDF can differ slightly from the preview.
The first time someone sends a chat message, Paidnice asks for consent to use your data with AI. Click I consent on behalf of my organisation and the message is sent. Only a user who can edit settings can give consent, and it covers every AI feature in Paidnice.
To rename the template, click its name in the editor header, type the new name and press Enter. Templates at the top left goes back to the list.
Editing a spreadsheet template
A spreadsheet template has no chat and no Options tab. The editor shows a preview of the rows on the left and the Columns panel on the right.
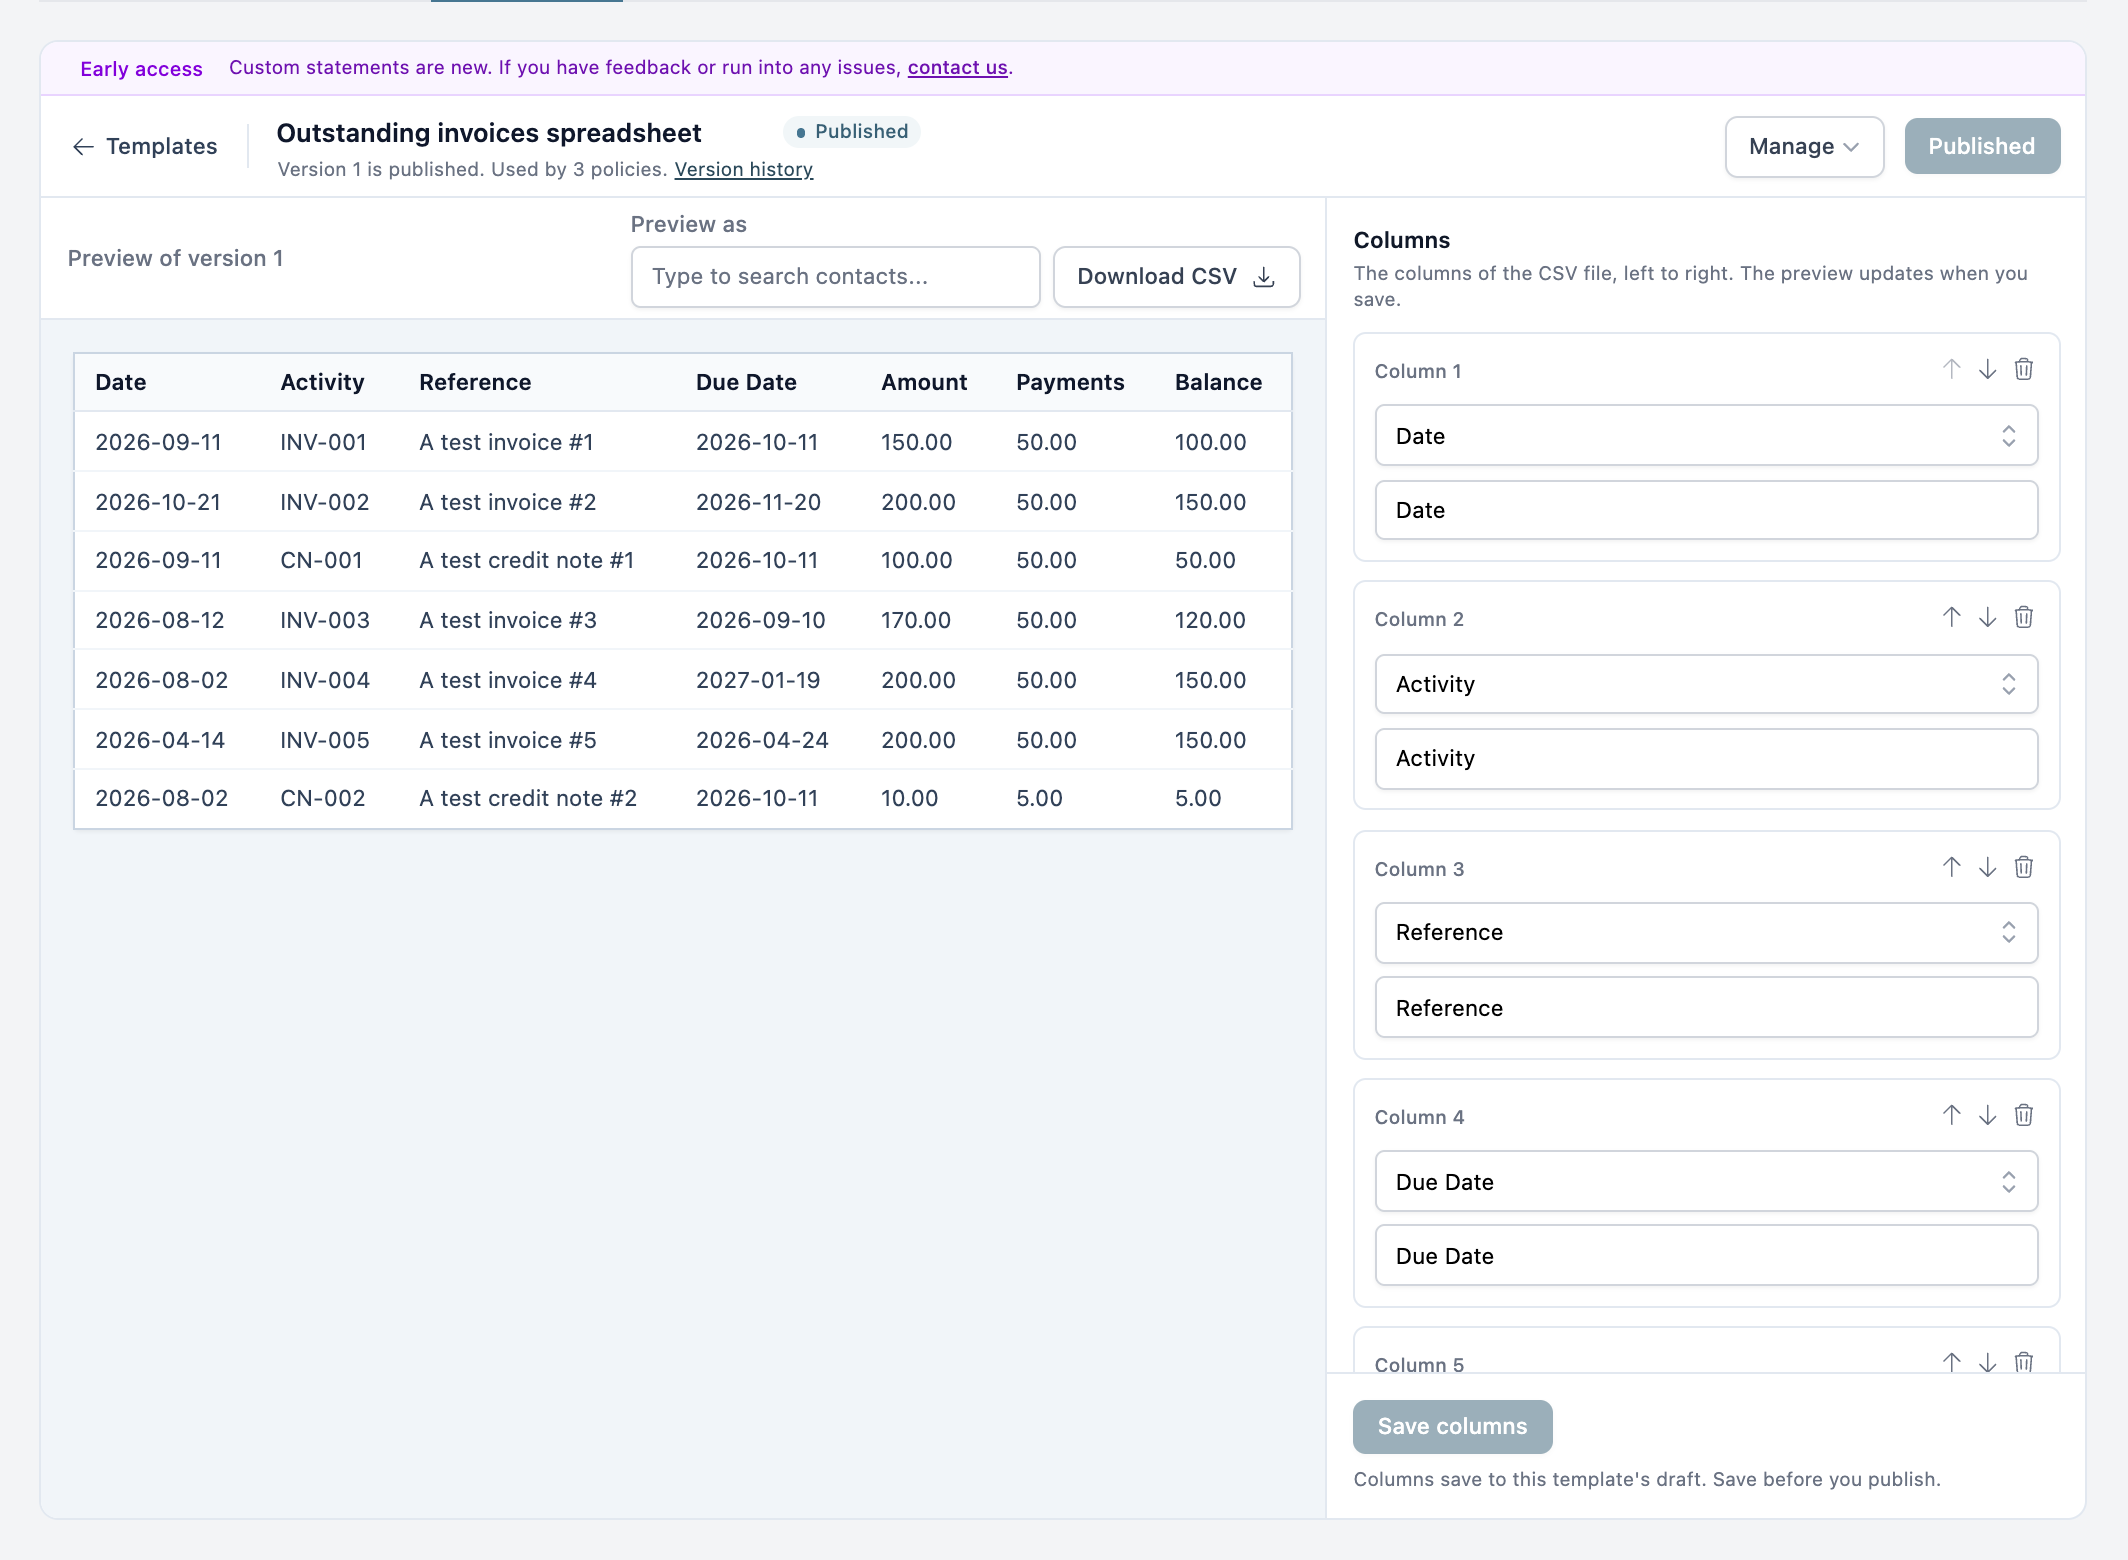
- Columns: the columns of the CSV file, left to right. For each one, pick the field from the list and type the header that goes in the first row of the file. A new spreadsheet starts with Date, Activity, Reference, Due Date, Amount, Payments and Balance. The list also has Overdue Age, Prompt Payment Discount, Tax Amount, Net Amount, Payment Date, Contact Name, Currency and Type, plus Statement Memo on QuickBooks. Any invoice custom fields Paidnice has synced are at the end, marked (Custom).
- The arrows on a column move it up or down, and the bin removes it. Add column adds another, up to 30. A spreadsheet needs at least one column, and every column needs a header of up to 100 characters.
- Totals row: adds a last row with the sum of each money column. On an activity spreadsheet the Balance column shows the closing balance instead of a sum.
- Save columns: saves your column changes to the draft and refreshes the preview.
- Activity period (activity spreadsheets only): how far back the spreadsheet goes, counted back from the end date of the statement period. It starts at 30 days and takes up to 1096 days or 36 months. It has its own Save.
- Preview as: pick a contact to preview the spreadsheet with their real data. Leave it empty to preview with sample data.
- Download CSV: downloads the preview as a CSV file.
Recent activity and Activity period both count back from the end date of the statement period. For a policy whose Outstanding Statement Period is Issued before current month or Issued only in the previous month, that is the end of last month. When the period has no end date, or one that is still to come, they count back from the day the statement is made.
In the file, dates are written as YYYY-MM-DD and amounts as plain numbers with two decimals, with no currency symbol or thousands separator. A customer with more than one currency gets one file per currency.
A spreadsheet template can’t be your default, so its editor has no Default switch. To use it, publish it, then select it under Statement attachments on a statement policy or a one-off send (see Setting one up), or under Spreadsheet downloads in Portal settings.
Drafts and published versions
Chat edits, saved options and saved columns only change the draft. Customers get the last published version until you publish again.
Click Publish and confirm to make the draft live. After the first time the button reads Publish version 2, and so on. While the draft and the published version differ, the header shows Unpublished changes and you can switch the preview between Your draft and Published version. Version history lists each published version with who published it and when.
On a spreadsheet template, click Save columns before you publish. Publishing only takes what is saved, so Paidnice stops you with “Save your column changes before publishing.” if there are unsaved column changes.
A template has to be published at least once before a policy, a download or the default can use it.
Making a template the default
Turn on Default in the editor header of a PDF template, or pick the template in Default statement template on the Common tab. Turning Default off again goes back to the standard statement if you still have it, and otherwise to the Paidnice default template.
A statement policy or a one-off send can attach other templates as well as the default, or instead of it. See Setting one up. The customer portal’s statement downloads have their own choice under Portal settings.
Duplicating, resetting and deleting
The Manage menu in the editor header has these actions:
- Duplicate: copies the draft and its options into a new template. A copy of a spreadsheet template is a spreadsheet of the same kind, with the same columns.
- Reset draft to base (PDF templates only): puts the draft back to the base template and starts a new chat. This cannot be undone. The published version stays as it is until you publish again.
- Delete: deletes the template with its chat and version history. This cannot be undone. You can’t delete a template while a policy has it selected in Statement attachments, while it is picked for a portal statement download (including Spreadsheet downloads), or when it is your only template. Remove it from those places first.
Standard statements
If you have the Standard tab, the template list includes Outstanding statement (standard) and, on Xero, Activity statement (standard). They can’t be edited in the builder. To change the design, create a custom template.
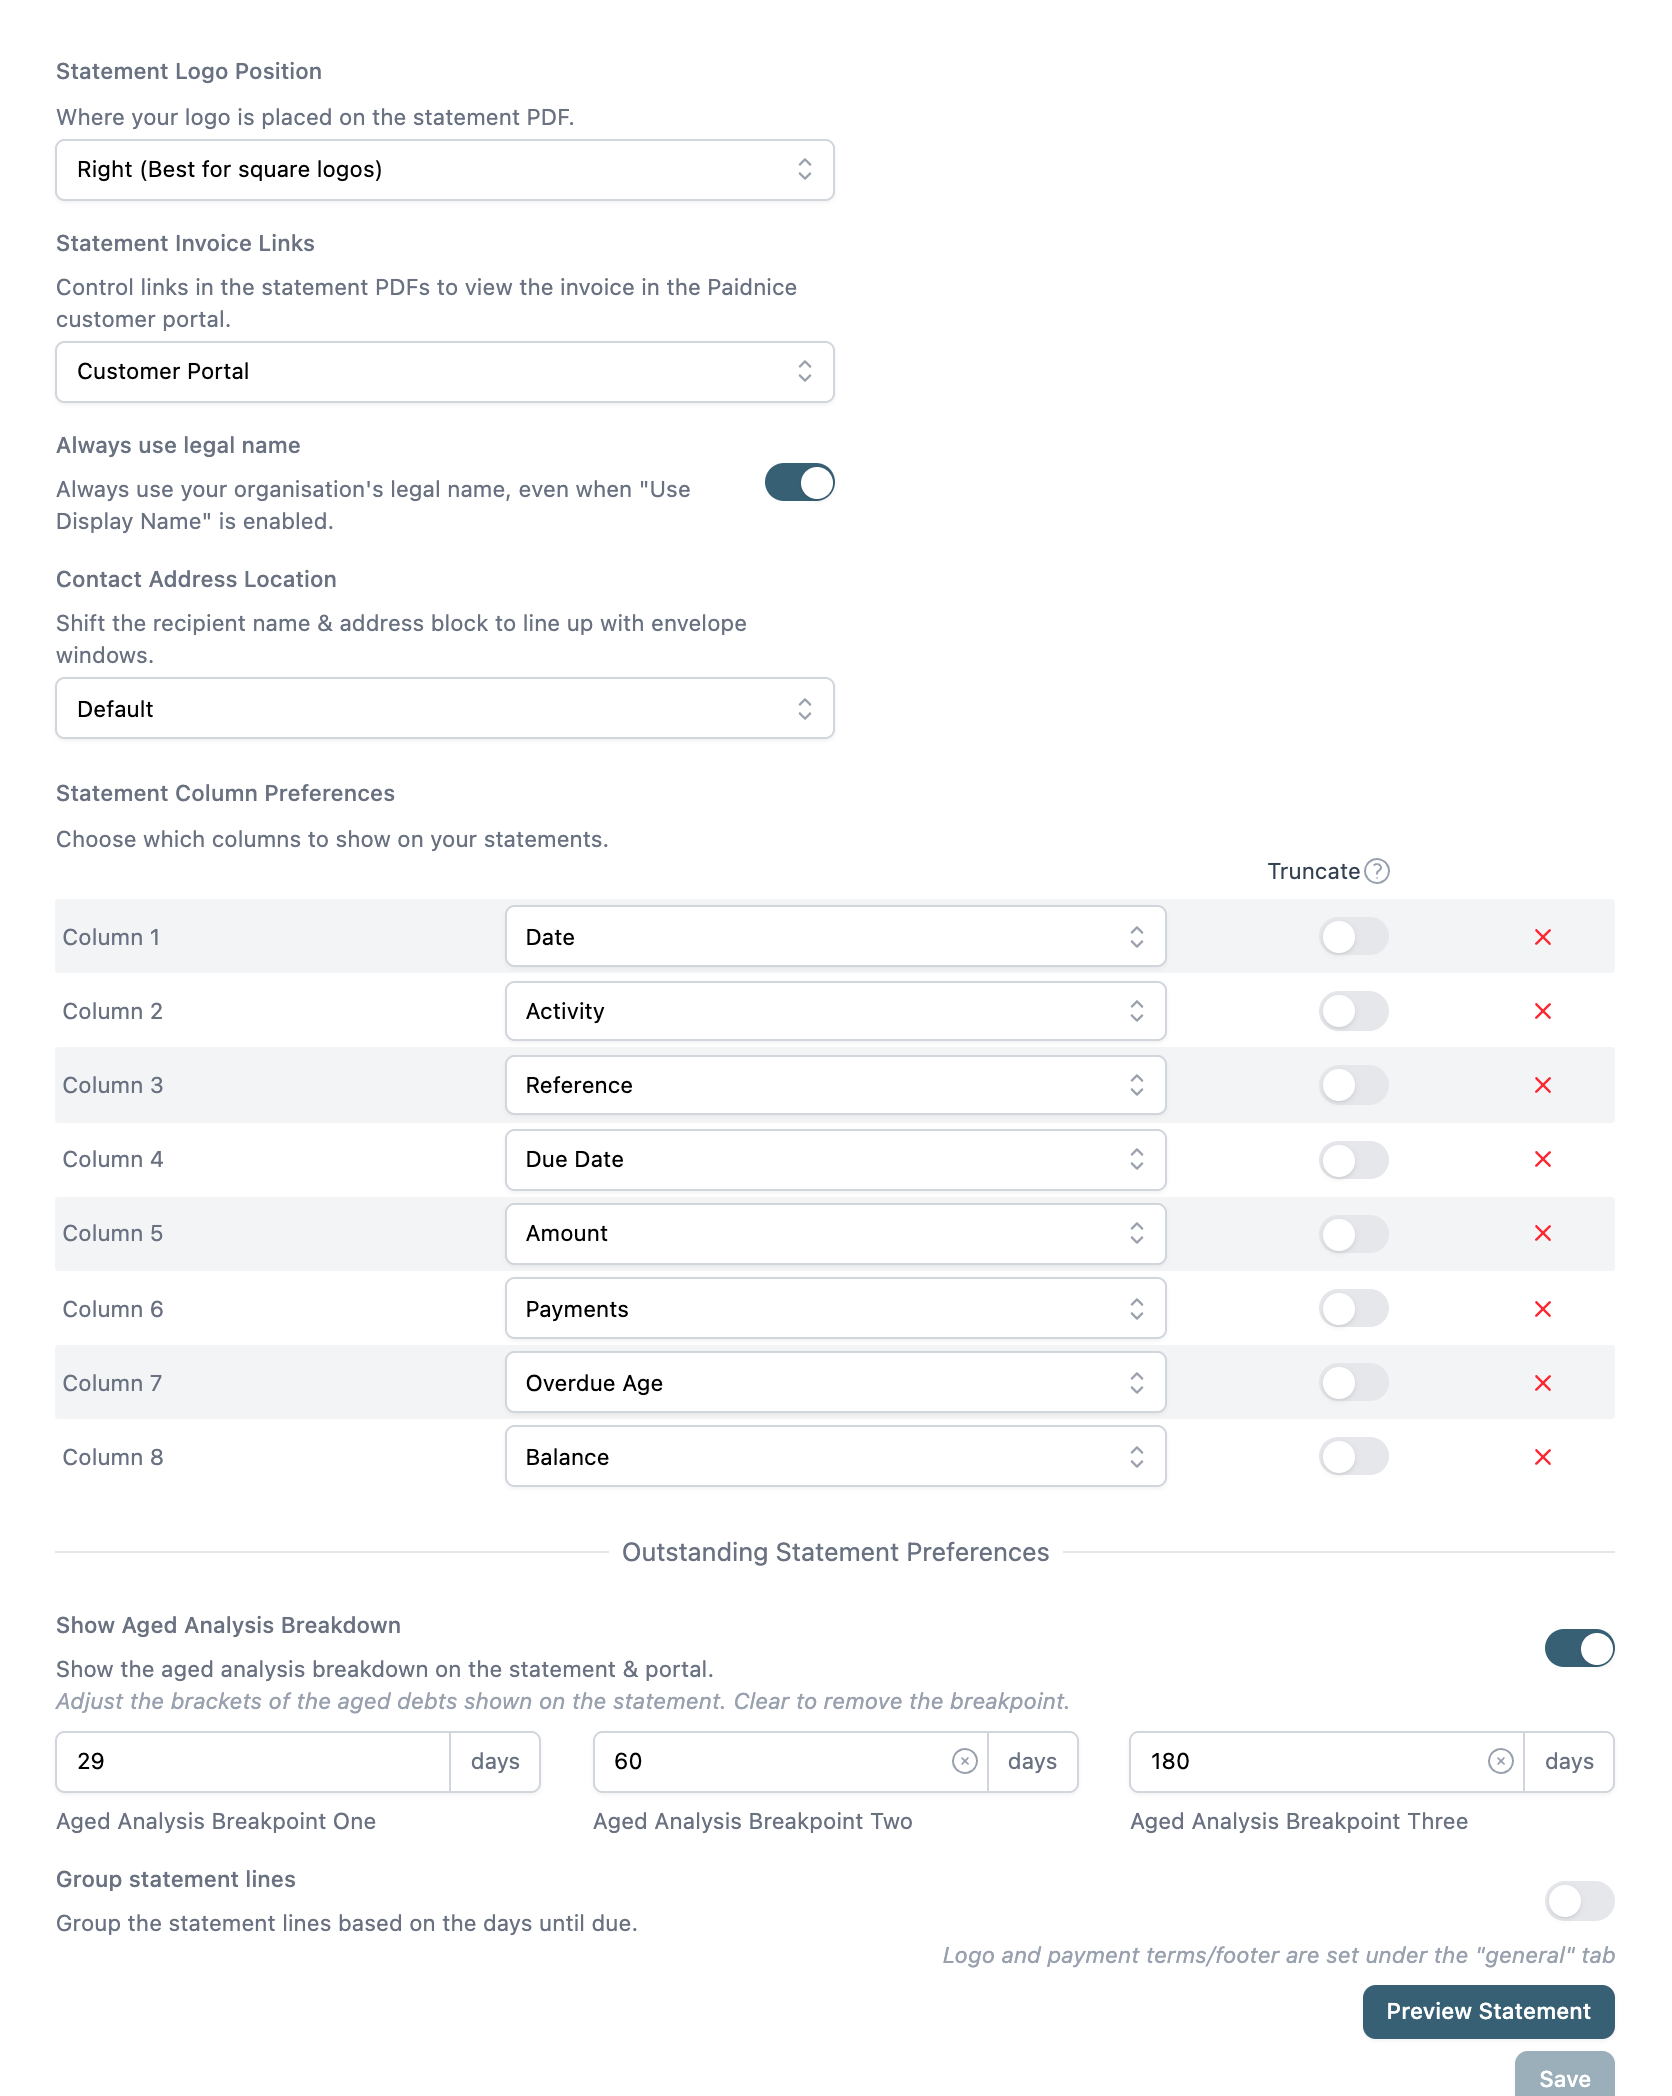
The Standard tab holds their settings. Custom templates ignore these and use their own.
- Statement Logo Position: Right (Best for square logos) or Top (Best for wide logos).
- Contact Address Location: Default, or Custom (offset for envelope windows) with an offset from the left and from the top in cm.
- Statement Column Preferences: the columns on the statement PDF. Choose between 5 and 8 columns, and turn on Truncate for any column whose content is too long to fit. The online statement in the customer portal has its own columns. See Portal settings.
- Show Aged Analysis Breakdown, with three breakpoints. They default to 29, 60 and 180 days, and you can clear the second and third.
- Group statement lines: groups lines by days until due. Use 0 to split overdue from outstanding on the due date.
- Default period from and Default period to under Activity Statement Preferences (Xero only): the range used for activity statement PDFs. Left blank, it runs from the start of the month 18 months ago to the end of the current month.
- Outstanding Statement Footer and Activity Statement Footer: the text printed at the bottom of each standard statement, such as payment details. Each is shown only if you still have that standard statement.
The aged analysis and grouping here only apply to statement PDFs. The customer portal has its own copy of both under Organisation Settings, Portal.
The logo comes from Organisation Settings, General.
Deleting a standard statement
Once you have moved to custom templates you can remove a standard statement with Delete on its row in the template list. This is permanent. Your organization can’t get the standard statement back.
Delete is unavailable while the statement is:
- the default template. Pick a different default first.
- used by a policy. Remove it from Statement attachments on those policies.
- picked for a statement download under Organisation Settings, Portal.
Deleting Activity statement (standard) removes activity statement PDFs altogether: it disappears from Statement attachments on statement policies and one-off sends, and the activity download disappears from the contact’s Statement tab. You can still view a contact’s activity on screen on their Statement tab, and on Xero an activity spreadsheet template still works.
When both standard statements are gone, the Standard tab goes too.
Things to know
- Custom statements are in early access. The Custom tab and the template editor show an Early access banner. Click contact us in it to send feedback or report a problem.
- The builder has a daily usage limit per organization. If you reach it, chat is unavailable until the next day. You can still publish, change options, edit spreadsheet columns and pick templates.
- Only users who can edit settings can create, edit, publish or delete templates.
- The footer used to be one setting under Organisation Settings, General. When it was split, every template and the portal kept a copy of that text, so nothing changed until you edit one. A footer change on a custom template goes live when you publish it.
- A template can’t be changed by two people at once. If the assistant is still applying a change, wait for it to finish before you save options, revert or publish.